<ul id="yy6ca"></ul> <del id="yy6ca"></del> 
Project Introduction
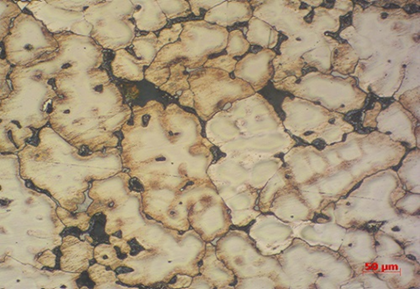
The number of crystal grains per unit area is related to the size of the crystal grains, and the size of the crystal grains has a decisive influence on the mechanical properties such as the tensile strength, toughness, and plasticity of the metal. Check the material grain size to evaluate the material performance. Applications include: steel, copper alloy, aluminum alloy, magnesium alloy, nickel alloy, titanium alloy, etc.
Relationship between strength and grain size
The relationship between metal strength and plasticity and grain size.
Strength: There is a Hallpage formula, the strength of the material becomes stronger as the grain size becomes smaller, and the strength will be greatly reduced when the temperature is increased, but this formula is not suitable for nano-grain, and the strength of nano-crystal is enhanced ; But the single crystal strength does not follow the above rules, the single crystal strength is very strong, and can still maintain a strong strength at high temperatures.
Plasticity: Within a certain volume of crystals, the more the number of grains, the more the grain boundaries, the finer the grains, and the more the grains in different orientations, so the resistance to plastic deformation is also greater. The polycrystalline grains are not only high in strength, but also good in plasticity and toughness. Because the finer the grains, under the same transformation conditions, the amount of deformation can be dispersed in more.

Guideline
Grain size test standard
GB/T 4335-2013 Low carbon steel cold rolled sheet ferrite grain size determination method
GB/T 6394-2002 Metal average grain size determination method
ASTM E112-13 Standard Test Method for Determination of Average Grain Size
YS/T 347-2004 Copper and copper alloy average grain size determination method
experiment method
The grain size inspection methods are:
(1) Carburizing method. Insulate the sample at 930 °C ± 10 °C for 6 hours to obtain a carburized layer of 1 mm or more on the surface of the sample. After carburizing, the sample furnace is cooled to below the lower critical temperature, and the cementite network is precipitated on the austenite grain boundaries in the hypereutectoid zone in the carburized layer, and after grinding and etching, it shows austenite Grain boundary. This method is suitable for carburizing steel.
(2) Oxidation method. Polish the test surface of the sample, then put the polished surface up in the heating furnace, heat at 860 ℃ ± 10 ℃ for 1 hour, and then quench into water or brine, after grinding and etching, it will show that the oxide is along The morphology of the original austenite grains distributed at the grain boundaries. This method is suitable for carbon steel and alloy steel with a carbon content of 0.35% to 0.60%.
(3) Reticulated ferrite method. Heat the sample with carbon content no more than 0.35% at 900℃±10℃, and the sample with carbon content greater than 0.35% at 860℃±10℃ for 30min,
Then air-cooled or water-cooled, after grinding and etching, the ferrite network is shown along the original austenite grain boundary. This method is suitable for carbon steel with a carbon content of 0.25% to 0.60% and alloy steel with a carbon content of 0.25% to 0.50%.
(4) Direct quenching method. Samples with carbon content not more than 0.35% at 900℃±10℃, samples with carbon content greater than 0.35% are heated at 860℃±10℃ for 60min, and then quenched to obtain martensite structure, after grinding and etching Austenite grain boundaries are displayed. In order to clearly show the grain boundaries, it can be tempered at 550℃±10℃ for 1h before corrosion. This method is suitable for direct quench hardening steel.
(5) Reticulated cementite method. The sample is heated at 820 ℃ ± 10 ℃, holding for more than 30 minutes, the furnace is cooled to below the lower critical temperature, so that the cementite network precipitates on the austenite grain boundaries. After grinding and etching, it shows austenite grain morphology. This method is suitable for hypereutectoid steel.
(6) Reticulated pearlite method. Use a rod sample of appropriate size, heat to the specified quenching temperature, quench one end of the sample in water after heat preservation, and after grinding and etching, you can see the austenite grain morphology shown by the fine pearlite mesh . This method is suitable for hypereutectoid steels that other methods cannot show.


BSCI certification is an abbreviation of BusinessSocialComplianceInitiative, and Chinese is called business social standard certification. BSCI is an organization that advocates the business community to abide by social responsibility. At the same time, it is a non-profit organization.

CMA, the name is \"China Metrology Accreditation\", the abbreviation of \"China Metrology Accreditation\" in English. According to the provisions of Article 22 of the Metrology Law of the People’s Republic of China: “The product quality inspection agency that provides notarized data to the society must be evaluated by the metrological administrative department of the people’s government at or above the provincial level for the capability and reliability of metrological verification and testing. Qualified.\"

Laboratory accreditation is a third-party certification that CNAS has the ability to perform specific testing and calibration work for testing and calibration laboratories.
The number of crystal grains per unit area is related to the size of the crystal grains, and the size of the crystal grains has a decisive influence on the mechanical properties such as the tensile strength, toughness, and plasticity of the metal.
Get a quote